Research Day - Guidance for Poster Presenters
Annual Multi-Campus Family Medicine Research Day
POSTER GUIDELINES
There will be two 40-minute poster sessions (Poster Session 1 at 1:00-1:40PM; Poster Session 2 at 2:25-3:05PM). Posters will be simultaneously displayed in three break-out rooms. Please refer to your acceptance letter to determine your poster’s assigned session and room. Upon arrival at the event, presenters should deliver their poster to their assigned room.
Those in Poster Session 1 should set up their posters upon arrival. Event staff will be onsite to assist. At the conclusion of Poster Session 1, presenters should remove their poster from display (they may store their poster in a discrete corner of the room if they wish) before proceeding to the Dr. Beatriz Solis Hall for Lectern Session 1. This will allow event staff to prepare the room for Poster Session 2.
Those presenting in Poster Session 2 should place their poster in a discrete corner of their assigned room upon arrival at the event. This allows event staff to confirm that each poster has arrived and also allows presenters to attend the rest of the event unencumbered. Poster Session 2 presenters should not place their poster for display until Poster Session 1 has ended; event staff will assist with this process.
For posters that are rolled up: We ask that presenters please put their name, room, and poster session on the outside of the roll/case so that it can be identified without needing to be unrolled. Example: “Joe Bruin, Cabrillo, Session 1.”
Due to space constraints and easel size, the recommended poster size is 2 ft (H) by 3 ft (W). We encourage posters on poster-board/hard cardstock so they can stand upright on their own, but we will also have clips available for those printed on paper. We do not recommend vinyl as those posters are too heavy for our clips. Presenters are welcome, but not required, to provide business cards or handouts to attendees.
Those presenting Research Abstracts (as opposed to Case Reports) must prepare a 30- to 60-second oral summary (AKA “elevator pitch”) to be presented during their assigned Poster Session. At approximately 15 minutes into each poster session (1:15pm for Session 1 and 2:40pm for Session 2), event staff will make an announcement and those presenting research abstracts will take turns presenting their 30- to 60-second oral summary to the room at large. (Note: this is only for research abstracts, those presenting case reports will not be giving an oral summary). If you are giving an oral summary, please ensure that you do not go over the 60-second time limit. Due to the high volume of research abstracts at this year’s event, you WILL be cut off if you exceed this time limit. We recommend you practice with a timer in advance. There will only be one round of oral summaries per session (unlike previous years). After the oral summaries have concluded, attendees will be instructed to continue perusing both abstract and case report posters in all three breakout rooms.
More information, including the event agenda, can be found on our Research Day Website. If you have any questions, please feel free to reach out to [email protected].
Please RSVP by May 15!
CREATING A RESEARCH POSTER USING POWERPOINT
NOTES: Depending on the version of PowerPoint you are using, these instructions may vary. You should build your poster on one slide within PowerPoint. Maintain 1-inch margins on all sides to prevent cropping when you print the final poster. Check with your printer (we recommend FedEx or Bruin Print) in advance in case they have special formatting requests.
Step-by-Step Directions:
- Open a new/blank presentation in PowerPoint.
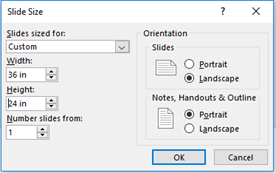
- To set the correct size, select the Design tab, and click on Slide Size. Select Custom Slide Size.
- For Orientation (slides), select Landscape. Set the Width to 36 inches, and the Height to 24 inches. Only make the poster larger if you need more space for all data/text to be legible. Click OK.
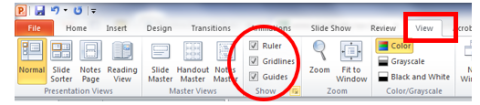
- Now that your slide is the correct size, you may want to add some gridlines to make it easier to keep the text in line. To do this, click on the View tab. Check the Ruler and Gridlines and Guides boxes.
- To enter text, use the Text Box feature, found on the Insert tab.
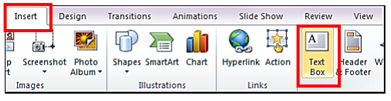
- Place the text box where you want text to appear. (You can also cut-and-paste tables from Word or Excel, and insert images). If you are having difficulty reading the text, click on the Zoom icon in the View tab. Zoom back out to “Fit to Window” to get the big picture when you are working on the overall layout/design of the poster.
- The title, authors, and affiliations should be aligned at the top center of your poster. Choose a large font size for the title (around 80-90) and a somewhat smaller font size for the authors and affiliations (around size 50-60). The other text boxes (for intro, methods, results, conclusion, etc.) should be ordered from the top left to bottom right, usually in two to four neat columns. Headings are usually centered, typically around font size 30-40. Text within each box should not be smaller than 18 pt font.
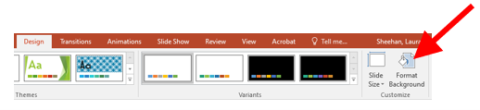
- Choose a color scheme that is engaging, but easy to read. Attractive posters tend to utilize 2-4 coordinated colors. To change the background, go to the Design tab, and click on Format Background.
- Good posters are visually appealing. Photos, graphs, and tables are great ways to convey data in an easy-to-read format. Be sure graphics are of high enough quality to ensure readability.
EXAMPLE: